1914 – 1917 saw a “War of Attrition“. The Allied and Central Powers troops had reached a stalemate with a line of trenches along the east side of France. Each side tried to smash its way through the deadlocks by weight of brute force. After a period of bombardment of an enemy line, a mass of soldiers would get up out of their trenches and try to force their way through the enemy lines.
For example, on July 1st, 1916, after a week of bombardment, using 500 heavy guns and 1.5 million shells, the British advanced on the German lines. As soon as the bombardment ended, the Germans emerged from their trenches to man their machine guns and rifles as the Allied troops advanced toward them. The British casualties in that one day’s advance attempt were 57,470.
By 1917 it became obvious that a different strategy of attack was required.
The Canadian Army Corps, under the command of Sir Julian Byng, was organized into 5 Divisions. Each Division was made up of a few Brigades. Each Brigade was made up of several Battalions and specialized Companies. In each Battalion, there were several platoons.
The platoon was the smallest organizational structure. Each platoon had one commander and usually 5 or more Platoon Commanders. During the battle all the platoons had to wait until told what to do by their Brigade Commander, and the Brigade Commander had to wait until told what to do by the Division staff. This took too long to make decisions in the immediacy of the changes of battle, and many soldiers were being killed by poor decision making.
By 1917 the British and Canadian command structure changed the decision-making chain so that each platoon Commander would have the authority to make decisions immediately as needed. The strategy of conducting the war was still designed by Byng, his Division Major-Generals, and their support staff. However, a lot of battle preparation, all down the line of hierarchy, was now being done. This meant that once a battle strategy was designed, it was shared all the way down the line. Maps of the terrain to be crossed by each platoon were distributed. Rehearsal areas were roped off behind the lines and individual Battalions and platoons were rotated off the front line to practice every move they would make during the future battle.
That meant that platoons and Battalions had greater degrees of authority to adapt to changing battle conditions because they all knew “the big picture”. Each platoon knew where the one behind it or beside it was going and when. They knew who to ask for support and they knew who was near them who made need support if available. Having everyone in the platoon trained was also useful as during battle it was usual for commanders to be killed and the next rank of authority would be able to rise to the leadership position as he was familiar with the details of the battle.
Platoon Structure:

Battalion Structure:

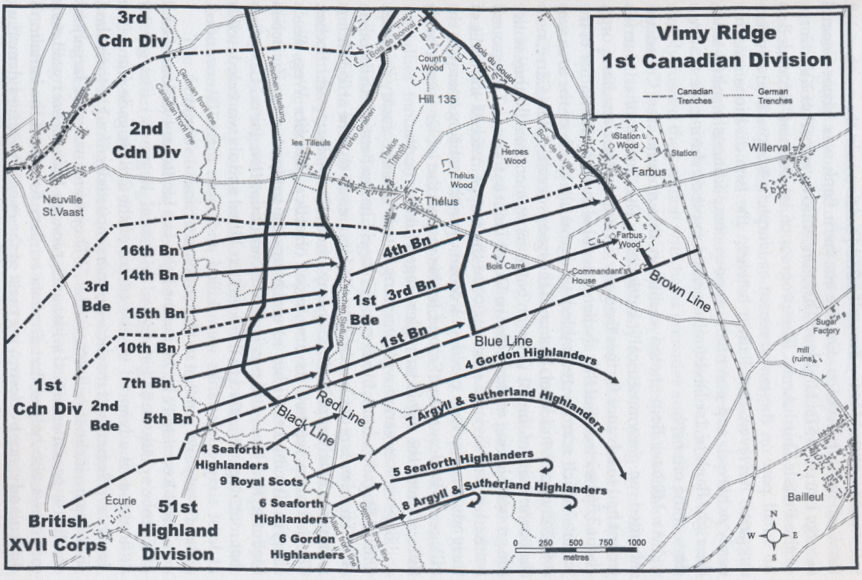
Maps on other pages indicate where Brigades and Divisions were located at Arras (including Vimy Ridge) in 1917.
Canadian Corps – Order of Battle 1917 (Divisions, Brigades, Battalions, Companies, etc.)


German Army – Order of Battle 1917


